Sequencer User Guide

Installation, pattern creation, MIDI routing and performance controls.

1. Installation and Architecture Support

Sequencer is a MIDI-effect plugin. The main plugin is installed as VST3; there is no standalone application. The optional Max for Live device opens and controls the same VST3 inside Ableton Live, so the VST3 is always required even when Max for Live is selected.

Platform Machine architecture Plugin format Max for Live
macOS Apple Silicon (arm64) and Intel (x86_64), Universal binary VST3 — required Optional
Windows 64-bit Intel and AMD (x64) VST3 — required Optional

Before installation

  • Close your DAW before running the installer.
  • Install the Max for Live component only if you use Ableton Live with Max for Live.
  • The Max device does not replace the VST3; it hosts the VST3 and therefore depends on it.

Install on macOS

  1. Download and open Sequencer-macOS.pkg.
  2. Continue to the component-selection screen.
  3. Keep VST3 Plugin (Required) selected.
  4. Leave Max for Live Device selected if you want Ableton integration, or deselect it otherwise.
  5. Complete the administrator-authorized installation, then restart or rescan your DAW.

The VST3 is installed in /Library/Audio/Plug-Ins/VST3/. When selected, the Max device is installed in ~/Music/Ableton/User Library/Presets/MIDI Effects/Max MIDI Effect/.

Install on Windows

  1. Download and extract Sequencer_Setup.zip.
  2. Run Sequencer_Setup.exe.
  3. The required VST3 component remains enabled automatically.
  4. Select the optional Max for Live device only when you need Ableton integration.
  5. Finish installation, then restart or rescan your DAW.

The VST3 is installed in the system Common Files VST3 directory. When selected, the Max device is installed in Documents\Ableton\User Library\Presets\MIDI Effects\Max MIDI Effect\.

2. Quick Start and Signal Flow

Sequencer receives MIDI notes, transforms them through the active pattern and sends the resulting MIDI to the next instrument. It does not generate audio, so an instrument must receive its MIDI output.

Use the VST3 in a compatible DAW

  1. Create a MIDI or instrument track and load the Sequencer VST3.
  2. Place an instrument after Sequencer when the DAW supports MIDI effects in a device chain. In hosts that use separate tracks, route Sequencer’s MIDI output to the instrument track.
  3. Enable Play in Sequencer.
  4. Send a MIDI note to the plugin. The selected play mode determines whether the pattern plays while the note is held, toggles, latches or responds polyphonically.
  5. Select Pitch and draw step values in the pattern editor.
  6. Select Velocity, Gate or Rate to shape the performance further.
  7. Enable Sync and choose a Beat value when you want the sequence locked to the DAW timeline.

Use Sequencer in Ableton Live

  1. Create a MIDI track.
  2. Place the Sequencer Max for Live device before the target instrument.
  3. Press Open Sequencer on the Max device to open the VST3 editor.
  4. Enable Play, send a MIDI note and draw the pattern in the plugin window.
  5. The Max device passes Sequencer’s generated MIDI to the next instrument in the chain.

Signal flow

Compatible VST3 host: MIDI input → Sequencer VST3 → instrument → audio output.

Ableton Live: MIDI input → Sequencer Max for Live device/VST3 → next instrument → audio output.

Compatible VST3 host

MIDI Input Sequencer VST3 Instrument

Ableton Live

MIDI Input Sequencer Max for LiveHosts the VST3 Next Instrument

3. Interface Overview

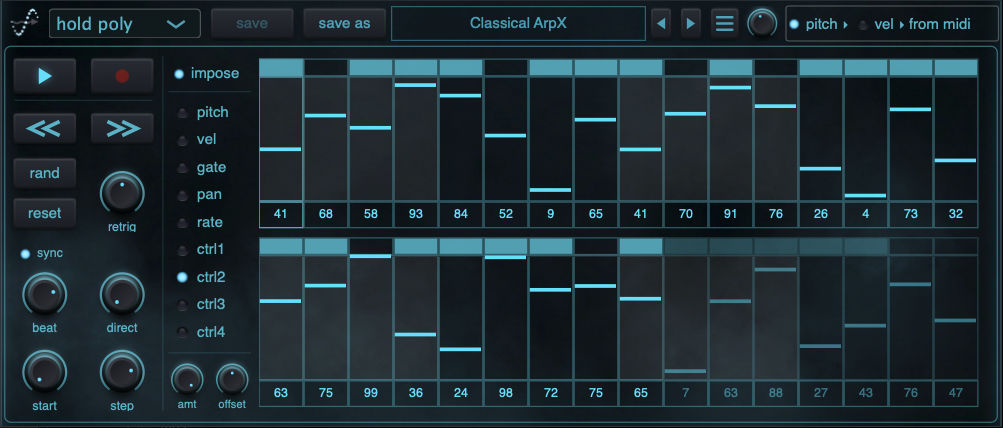
Sequencer keeps playback, pattern editing and performance controls in one window. The large editor on the right shows the selected lane across 32 steps, while the controls on the left define how the pattern starts, advances and responds to incoming MIDI.

Sequencer VST3 interface showing its transport, pattern editor, section selector, timing controls and preset bar
The Sequencer VST3 interface with a pitch pattern loaded.

Top bar

Choose the play mode, save and browse presets, move to the previous or next preset, open the main menu and select the MIDI Center note from the controls across the top.

Playback and pattern actions

Play enables sequence output and Record captures incoming MIDI into the pattern. The shift buttons move the pattern, while Rand and Reset modify the selected lane. Retrigger and Impose determine how new notes interact with a sequence already in progress.

Section selector and CTRL shaping

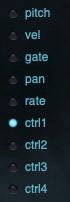
Select Pitch, Velocity, Gate, Pan, Rate or CTRL 1–4 to decide what the pattern editor displays. When a CTRL lane is selected, the Amount and Offset controls shape its outgoing values.

Timing and movement

Sync and Beat/Time control the timing source and step duration. Direction selects the playback order, while Start and Step define the starting position and movement through the pattern.

Pattern editor

The two 16-step rows form one 32-step pattern. Drag inside a step to edit the selected lane, and use the trigger row to enable or disable individual steps. The small triangle marks the selected starting step.

4. Pattern Editor

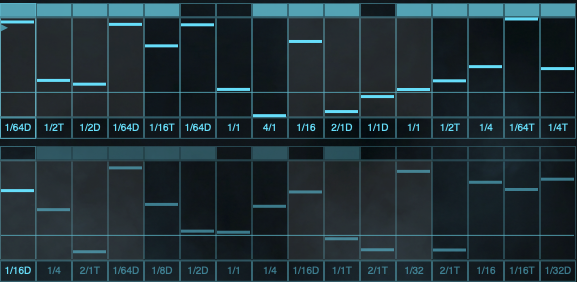
A pattern contains 32 steps, displayed as two rows of 16. Each step combines an on/off trigger with the value of the currently selected section. This lets the same 32-step pattern control pitch, velocity, gate, pan, rate and all four CTRL lanes.

The complete 32-step pattern editor displayed as two rows of 16 steps
The complete 32-step editor: steps 1–16 on top and steps 17–32 below.

Edit step values

First select the section you want to edit, then click or drag vertically inside the value area of a step. The line and value label update to show the new setting. Drag across multiple steps to draw a continuous pattern in one gesture.

Enable and disable steps

Use the trigger strip at the top of each step to include or remove that step from playback. A lit trigger is active; a dark trigger is disabled. Disabled steps remain part of the pattern but do not generate a sequenced note.

Choose the starting step

The small triangle at the left edge of a step marks the current Start position. Change it with the Start control, and Sequencer will begin from that position when the pattern is started or restarted.

Edit the complete lane with Alt/Option

Hold Alt on Windows or Option on macOS while changing a step to apply the change across all 32 steps in the currently selected section. On the trigger strip, the first clicked step determines the result: clicking an inactive trigger activates every trigger, while clicking an active trigger disables every trigger.

A drag from mouse-down to mouse-up is treated as one edit for Undo and Redo, even when the gesture changes multiple steps.

5. Pitch, Velocity, Gate, Pan, Rate and CTRL Lanes

Every lane stores its own value for each of the 32 steps. Select a lane to display and edit it without changing the values stored in the other lanes. The illuminated indicator shows which lane is currently visible in the pattern editor.

Sequencer section selector with Pitch, Velocity, Gate, Pan, Rate and four CTRL lanes
Select the lane you want to edit.

Pitch

Transposes each generated note in semitones. Choose the editing range from Pitch Range in the main menu: −12 to +12, −24 to +24, 0 to +12, 0 to +24 or 0 to +15. Notes recorded outside the selected range are folded by octaves so their pitch class remains inside the visible range.

Velocity

Sets the note strength for every step on a displayed 0–100 scale, which is converted to the MIDI velocity range of 0–127. When Vel: From MIDI is enabled, the incoming note velocity scales the value stored in this lane.

Gate

Controls how long the generated note remains on within its step. Lower values create short, detached notes; higher values hold the note for more of the step duration.

Pan

Stores a left-to-right position for each step. When Send Pan (CC 10) is enabled in the main menu, Sequencer sends these values to the next MIDI device or instrument. Disable Send Pan when you want the destination’s pan control to remain independent.

Rate

Changes the duration of individual steps relative to the main Beat or Time setting. Values include straight, dotted and triplet divisions from 4/1 through 1/64. This can create patterns whose rhythm changes from one step to the next.

CTRL 1–4

Provide four independent 0–100 control lanes for parameter movement. They send MIDI CC 110–113 and can be mapped to controls in the next instrument or effect with MIDI Learn. Selecting a CTRL lane also enables its Amount and Offset knobs.

Randomize and reset

Rand and Reset normally affect only the selected lane. Hold Shift while pressing either button to apply the action to every lane, including the trigger pattern. The affected lane indicators briefly highlight to confirm the scope of the action.

6. Timing, Direction, Start and Step

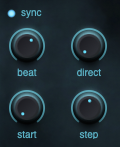
These controls define the sequence clock, playback order and active section of the 32-step pattern. Drag a knob vertically to change it; its current value appears while the pointer is over the control.

Sequencer Sync, Beat, Direction, Start and Step controls
With Sync enabled, Beat sets the host-relative base duration.

Sync

Enable Sync to follow the DAW tempo and timeline. Sequencer uses the host PPQ position when the host provides it, with its internal sample scheduler as a fallback. Disable Sync to use a fixed time in milliseconds instead.

Beat or Time

In Sync mode, the upper-left knob is Beat and selects a musical division from 4/1 through 1/64, including dotted and triplet values. With Sync off, the same position becomes Time and sets the base step duration from 10 to 2000 ms. Values in the Rate lane scale this base duration per step.

Direction

The Direction knob provides five playback orders:

  • frw — move forward through the active steps.
  • rev — move backward through the active steps.
  • f-b1 — move forward and backward, repeating the end steps when the direction changes.
  • f-b2 — move forward and backward without repeating the end steps.
  • rand — choose an active step at random.

Start

Chooses the first step of the active sequence from 1 to 32. The small triangle in the pattern editor marks this position. Changing Start also prepares playback to restart from the selected step.

Step

Sets the active sequence length from 1 to 32 steps. The length begins at Start and wraps past step 32 when necessary. Steps outside this active range appear dimmed and are skipped during playback.

Tip: Hold Alt on Windows or Option on macOS and click a knob to return it to its default value.

7. Play Modes, Retrigger and Impose

Play Mode controls how incoming notes start, select and stop the sequence. Retrigger decides when a new note returns playback to the Start step, while Impose controls whether automation is sent on steps whose note trigger is disabled.

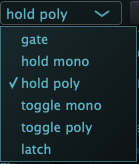
Sequencer Play Mode menu showing Gate, Hold Mono, Hold Poly, Toggle Mono, Toggle Poly and Latch
Play Mode
Sequencer Retrigger knob
Retrigger
Sequencer Impose option
Impose

Play Modes

  • Gate — the most recently pressed note starts the sequence, and releasing it stops playback.
  • Hold Mono — the latest note replaces the previous note and the sequence continues after the key is released.
  • Hold Poly — held notes are stored and used in turn as the sequence advances. Releasing a note removes it; playback stops after all notes are released.
  • Toggle Mono — press a note to start it. Press the active note again to stop, or press a different note to replace it.
  • Toggle Poly — each note press toggles that note into or out of the active group. Sequencer cycles through the enabled notes and stops when the group is empty.
  • Latch — the first note press starts and latches the sequence; the next note press stops it. Key release does not stop playback.

The main Play button must be enabled before incoming notes can activate any Play Mode.

Retrigger

Drag the Retrigger knob to choose how another Note On affects an active sequence:

  • off — incoming notes do not restart the pattern; playback continues from its current position.
  • step — restart from the selected Start position on the next scheduled step boundary.
  • now — restart from Start immediately at the incoming note’s sample position.

Step is the smooth default for tempo-based playback because it changes the note while preserving the current step boundary. Now is useful when every key press must begin the pattern immediately.

Impose

Normally, a step with its trigger disabled sends no note and no pattern automation. Enable Impose to continue sending Pan and CTRL 1–4 values on those disabled note steps. Impose does not turn the note trigger back on; it lets the control lanes continue moving the destination while the note pattern contains rests.

8. MIDI Input and Pattern Recording

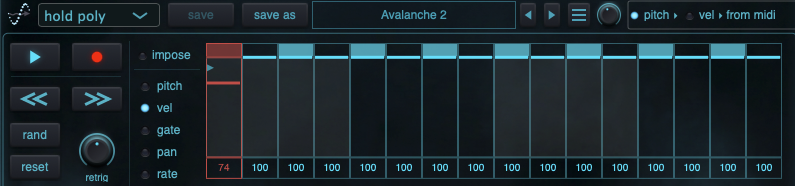
Record captures incoming note pitch and velocity directly into consecutive pattern steps. Pitch From MIDI, Velocity From MIDI and MIDI Center then determine how incoming notes are combined with the recorded pattern during normal playback.

Sequencer recording MIDI into the Velocity lane with Pitch From MIDI, Velocity From MIDI and MIDI Center controls visible
Record is active while incoming notes populate consecutive pattern steps.

Record a pattern

  1. Set Start and Step to choose the part of the 32-step pattern you want to record.
  2. Press Record. Sequencer automatically enables Play if it is off.
  3. Play notes from a MIDI keyboard, MIDI clip or other routed MIDI source.
  4. Each Note On writes its pitch and velocity into the current step, enables that step’s trigger and advances to the next active step.
  5. After the final active step, recording wraps back to Start.
  6. Press Record again to finish. Turning Play off also stops recording.

While Record is enabled, the pattern itself does not generate sequenced notes. Incoming notes pass to the next instrument so you can hear what you are recording.

Recorded pitch and the selected Pitch Range

Recorded pitches are stored as offsets from C4 (MIDI note 60). If an incoming note falls outside the selected Pitch Range, Sequencer moves it by complete octaves until the same pitch class fits inside the range. For example, +13 becomes +1 in a 0 to +12 range instead of being clamped to +12.

Pitch From MIDI

When enabled, the incoming note’s distance from C4 (MIDI note 60) is added to MIDI Center and the Pitch lane value. This lets the same pattern transpose with the notes you play. When disabled, incoming notes only activate the selected Play Mode; output pitch comes from MIDI Center plus the Pitch lane.

Velocity From MIDI

When enabled, incoming note velocity scales the value stored in the Velocity lane. When disabled, the Velocity lane alone determines the output velocity.

MIDI Center

The knob in the top bar sets the output base note. Its default is C4 (MIDI note 60). Change it to transpose the entire generated sequence without editing every Pitch step. MIDI Center is stored with the preset.

MIDI pass-through

With Play off, Sequencer behaves like a bypassed MIDI effect and passes incoming MIDI to the next device. With Play on, incoming Note On and Note Off messages drive the sequencer instead of being duplicated at its output. Other MIDI—including pitch bend, modulation, sustain and aftertouch—continues downstream. Sequencer replaces only the CC messages it owns: CTRL 1–4 use CC 110–113, and Pan uses CC 10 when Send Pan is enabled.

9. CTRL Mapping, Amount, Offset and Pan

CTRL 1–4 turn a pattern into four independent automation lanes. Each lane sends a MIDI CC value on every active step, allowing Sequencer to animate parameters in the next instrument or effect. Pan provides a separate lane using the standard Pan controller, CC 10.

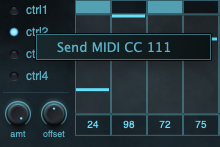
CTRL 2 selected with Amount and Offset controls and the Send MIDI CC 111 context menu open
Right-click a CTRL lane and send its CC while the destination is waiting for MIDI Learn.

Controller assignments

Lane MIDI controller Output range
PanCC 100–127
CTRL 1CC 1100–127
CTRL 2CC 1110–127
CTRL 3CC 1120–127
CTRL 4CC 1130–127

Map a parameter with MIDI Learn

  1. Place the destination instrument or MIDI-controlled effect after Sequencer.
  2. Enable MIDI Learn on the destination parameter.
  3. Right-click Pan or CTRL 1–4 in Sequencer.
  4. Select Send MIDI CC. Sequencer sends that lane’s controller once at full value so the destination can learn it.
  5. Exit MIDI Learn, select the lane and draw the desired 32-step control pattern.

The learned assignment belongs to the destination instrument, effect or DAW. Some plugins store MIDI Learn assignments inside each of their own presets, so changing the destination preset may remove the mapping.

Amount and Offset

Select CTRL 1, 2, 3 or 4 to enable the Amount and Offset knobs. Each CTRL lane remembers its own pair of settings.

  • Amount scales the pattern from 0% to 100%. At 100%, the lane uses its full drawn range; at 50%, its movement is reduced by half.
  • Offset shifts the scaled result from −100% to +100%.
  • The final value is limited to the valid MIDI range before it is converted to 0–127.

In formula form: output = clamp(pattern × amount + offset). For example, an Amount of 50% and Offset of +25% transforms a 0–100 pattern into a 25–75 output range.

The knobs are disabled while Pitch, Velocity, Gate, Pan or Rate is selected. Changing a CTRL knob in the Max for Live device updates the matching plugin knob, and changes made in the plugin are reflected in Max when that CTRL lane is selected.

Pan output

Open the main menu and enable Send Pan (CC 10) to transmit the Pan lane. Disable it when CC 10 would take control of a pan parameter that you want to adjust manually in the DAW. When Send Pan is disabled, the Pan lane and its right-click MIDI Learn action are disabled as well. This setting is saved with the preset.

In Ableton Live, the Max for Live device maps this lane directly to the track pan. In other DAWs, assign Pan manually: place the destination in MIDI Learn mode, right-click Pan in Sequencer and select Send MIDI CC 10. Complete the MIDI Learn operation in the destination so its pan or chosen parameter responds to the Sequencer Pan lane.

Control rests with Impose

By default, Pan and CTRL values are sent on steps with active note triggers. Enable Impose when you want these control lanes to continue updating across disabled note steps.

10. Max for Live Workflow

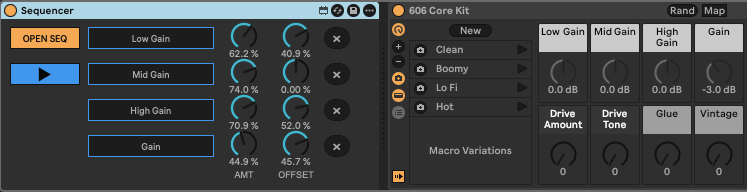
The Sequencer Max for Live device hosts the Sequencer VST3 inside Ableton Live and places its generated MIDI directly into the device chain. It also provides direct mapping for all four CTRL lanes and optional control of the track pan.

Sequencer Max for Live device showing Open Sequencer, Play, four CTRL mapping buttons, Amount and Offset controls
The Max for Live device hosts the VST3 and exposes its main Ableton controls.

Set up an Ableton track

  1. Create a MIDI track and place Sequencer from Max MIDI Effects on the track.
  2. Place the destination instrument after the Sequencer device.
  3. Send MIDI from a keyboard, clip or another routed track into this track.
  4. Press Open Seq to display the complete VST3 editor.
  5. Enable the Play button on either the Max device or the plugin, then send a note to start the selected Play Mode.

The VST3 is required even when you use Max for Live: the Max device is its Ableton host and controller, not a separate copy of the sequencer engine.

Open Seq and Play

Open Seq shows or hides the floating plugin editor. Closing the editor with its window close button also returns Open Seq to its off state. The Play button is synchronized in both directions, so changing it in Max updates the plugin and changing it in the plugin updates Max.

Map CTRL 1–4 to Ableton parameters

  1. Click Map CTRL 1, Map CTRL 2, Map CTRL 3 or Map CTRL 4. The button changes to Waiting.
  2. Click the parameter you want to control in an Ableton device.
  3. The mapping button displays the parameter name and its highlighted border confirms that the lane is mapped.
  4. Draw values in the corresponding CTRL lane inside Sequencer.
  5. Click the × button on that row to remove the mapping.

This Ableton mapping is direct and does not require the destination device’s MIDI Learn function. Each CTRL lane can control one mapped Live parameter.

Amount and Offset

Every mapped row includes its own Amount and Offset knobs. These are references to the matching settings inside the VST3; the calculation is performed by the plugin. Changes made in Max or in the plugin remain synchronized in both directions.

Track pan

When Send Pan (CC 10) is enabled in the plugin menu, the Max device binds the Pan lane to the current Ableton track’s pan control. Disable Send Pan to release that binding and adjust the track pan manually.

MIDI timing and transport

MIDI enters the Max device, is processed by the hosted VST3 and then continues to the next device in the chain. The Max device restores the sample offsets produced by Sequencer so generated events keep their position inside Ableton’s audio buffer. Sequencer can also run while Live’s transport is stopped; when the transport is playing in Sync mode, the host PPQ timeline becomes the timing reference.

Saving the Live Set

The hosted plugin state, CTRL mappings and Max controls are stored with the Ableton Live Set. Each Sequencer device instance keeps its own pattern, mappings and control values.

11. Presets, Copy and Paste

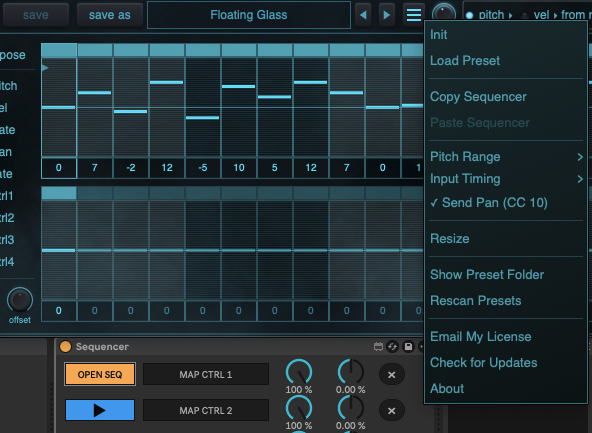
The top bar provides fast preset browsing and saving, while the main menu contains preset file tools and global Sequencer options. Undo and Redo are supplied by the DAW and therefore do not appear in this menu.

Sequencer preset top bar and main menu showing Load Preset, Copy Sequencer, Paste Sequencer and global options
The preset top bar and main menu. Paste remains unavailable until a sequence has been copied.

Browse and load presets

  • Click the preset name to open the preset list. Opening the list scans the preset folder and highlights the current preset.
  • Use the left and right arrows to load the previous or next item from the current preset list.
  • Choose Load Preset from the menu to open a .seqx file directly.
  • Choose Rescan Presets after adding, removing or renaming preset files outside Sequencer.
  • Choose Show Preset Folder to open the user preset location in the operating system.

Loading a preset replaces the complete Sequencer state and starts a new editing history, so Undo cannot return to the previously loaded preset.

Save and Save As

  • Save updates the current editable user preset.
  • Save As creates a preset with a new name and asks before replacing an existing file.
  • Save is dimmed for factory presets and read-only user presets; use Save As to create an editable copy.
  • Preset saving is unavailable during the trial.

Create a read-only preset

Hold the physical Control key while clicking Save or Save As to mark the saved preset as read-only. This uses Control on both macOS and Windows—not Command on macOS. The Save button becomes inactive after the read-only preset is loaded; use Save As when you want to create another version.

Delete a user preset

Open the preset list, hold Shift and right-click a preset, then confirm the deletion. Deleting the file cannot be undone.

Copy a sequence between plugin instances

  1. Open the main menu in the source instance and choose Copy Sequencer.
  2. Open another Sequencer instance in the same DAW session.
  3. Choose Paste Sequencer. The command is dimmed until something has been copied.

Copy Sequencer includes:

  • All 32 steps in every pattern lane, including triggers
  • Direction, Start and Step length
  • Sync, Beat and Time values
  • Retrigger and Impose
  • Amount and Offset for CTRL 1–4

The copied data is held in memory and shared by Sequencer instances in the current DAW process. It is intended for quick transfer during the session and is not a replacement for saving a .seqx preset.

Other menu options

  • Init returns the pattern and principal controls to their defaults.
  • Pitch Range selects the range used by the Pitch lane.
  • Input Timing: Free starts the pattern from the incoming Note On position.
  • Input Timing: Quantized aligns the first step to the next timing grid boundary.
  • Send Pan (CC 10) enables or releases Sequencer’s Pan output.
  • Resize changes the plugin editor size.
  • Email My License, Check for Updates and About provide account, version and product information.

12. Modifier Keys, DAW Undo/Redo and Ableton Keyboard Focus

Sequencer uses a small set of modifier keys for whole-pattern edits, preset protection and standard editing commands. Keyboard focus is especially important in Ableton Live because only the focused window receives computer-keyboard events.

Modifier-key reference

Modifier or shortcut Where to use it Result
Alt (Windows) / Option (macOS) Click or drag a pattern value Apply that value to all 32 steps in the selected lane.
Alt / Option Click a trigger Set all 32 triggers to the new state of the clicked trigger.
Alt / Option Click a knob Return the knob to its default value.
Shift Click Rand or Reset Apply the action to every pattern lane, including triggers.
Control Click Save or Save As Save the preset as read-only. On macOS this is Control, not Command.
Shift + right-click User preset in the preset list Open the confirmation for permanently deleting that preset.

DAW Undo and Redo

Sequencer has no Undo or Redo buttons and no Undo/Redo menu items. Use the standard editing shortcuts provided through the DAW environment:

  • macOS: Command–Z to undo; Command–Shift–Z or Command–Y to redo.
  • Windows: Ctrl–Z to undo; Ctrl–Shift–Z or Ctrl–Y to redo.

When the plugin window has focus, these standard shortcuts operate on Sequencer’s pattern edit history. One mouse-down-to-mouse-up gesture is one action, even when it draws across several steps. A knob drag, Rand, Reset, shift action and Paste are also each grouped as a single action. Pattern recording is not added as a series of Undo actions, and loading a preset clears the previous editing history.

Ableton computer-keyboard focus

Ableton’s Computer MIDI Keyboard and the Sequencer plugin cannot both receive the same keyboard event. The routing depends on which window currently has keyboard focus.

Ableton window focused

Computer Keyboard Ableton Computer MIDI Keyboard Track MIDI Input

Sequencer window focused

Computer Keyboard Sequencer Keyboard Handler Next Instrument

With Sequencer focused, Ableton does not convert the computer keyboard into track MIDI; Sequencer handles the piano-key layout itself and sends the resulting notes through its MIDI output. Press Z to lower the plugin keyboard octave and X to raise it. Click the Ableton window when you want Ableton’s keyboard shortcuts or Computer MIDI Keyboard to take control again. Sequencer releases held computer-keyboard notes whenever focus changes to prevent stuck notes.

This direct computer-keyboard handling applies to the Ableton/Max for Live workflow. In other VST3 hosts, use the host’s normal MIDI input and keyboard-focus behavior.

13. Trial and Activation

Sequencer can be evaluated in Trial mode before activation. The trial uses one shared session timer for every Sequencer instance running in the current DAW process.

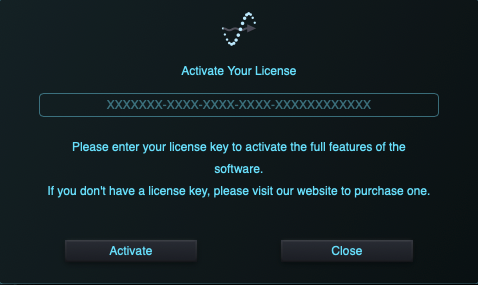
Sequencer license activation view with license-key field and Activate button
License activation

How the trial session works

  • The 10-minute countdown starts when the first Sequencer instance is loaded in the DAW.
  • All Sequencer instances share the same countdown; loading another instance does not start another timer.
  • Removing and reloading an instance does not reset the current DAW session timer.
  • The timer is held only in memory. Closing the DAW ends that session, and a new DAW session starts a new countdown.
  • The remaining time appears at the bottom-right as Trial MM:SS.

Trial restrictions

You can edit patterns and test playback during the active trial period, but Save and Save As are unavailable. Saving the DAW project does not save the Sequencer state while Trial mode is active. Trial patterns and settings therefore will not be restored when that DAW project is opened again.

When the session ends, Sequencer first releases any generated held note and then blocks both incoming and outgoing MIDI. The status changes to Trial session ended and the trial-ended view is displayed. If the editor is opened again after expiration, the same view is shown until the product is activated or the DAW session is closed.

Activate Sequencer

  1. Purchase Sequencer and copy the license key supplied with your order.
  2. Connect the computer to the internet.
  3. Open Sequencer’s main menu and choose Activate.
  4. Paste the complete license key into the license field.
  5. Click Activate and wait for verification to finish.
  6. After successful activation, close the activation view. The Trial label and session restrictions are removed.

In Ableton Live, press Open Seq on the Max for Live device and activate through the hosted VST3 editor. The Max device and VST3 use the same local Sequencer license.

Moving the license to another computer

A license is linked to the activated machine. If the key is already associated with another computer, Sequencer displays the available reactivation count and offers Reactivate. Confirming reactivation links the license to the current computer and uses one available reactivation.

License recovery and activation problems

  • On an activated installation, choose Email My License to send the license information to the purchase email address.
  • If a key is rejected, verify that the complete key was pasted without additional spaces and that the computer is online.
  • If no reactivations remain, or verification continues to fail, contact product support with the purchase email and the displayed message.