How to Use DWP-16
Step-by-step visual guide.
Installation
System Requirements
- 64-bit OS: Windows 10/11 or macOS 11+
- CPU: Intel/AMD x64 or Apple silicon
- RAM: 4 GB+
- Disk space: 200 MB+
- 64-bit DAW with VST3 support (Windows), VST3/AU/AAX (macOS)
Windows (VST3, Standalone)
- Download and run the installer.
- Close your DAW before installing.
- VST3:
C:\Program Files\Common Files\VST3\DWP-16.vst3 - Standalone app: Start Menu entry
- Open your DAW, rescan plugins, and insert DWP-16 on an instrument track.
macOS (VST3, AU, AAX, Standalone)
- Download the .pkg and run it.
- Close your DAW before installing.
- VST3:
/Library/Audio/Plug-Ins/VST3/DWP-16.vst3 - AU:
/Library/Audio/Plug-Ins/Components/DWP-16.component - AAX:
/Library/Application Support/Avid/Audio/Plug-Ins/DWP-16.aaxplugin - Standalone:
/Applications/DWP-16.app - If blocked, open via right-click → Open or allow under Privacy & Security.
Activation
Open DWP-16, go to the registration panel, and enter your license key. Without activation, the plugin runs in trial mode.
Uninstall
Windows: remove via Apps & Features. macOS: delete the plugin files and the app from the paths above.
Troubleshooting
- Rescan plugins from your DAW preferences.
- Confirm you installed the correct format for your DAW.
- Verify 64-bit mode and plugin folder paths.
- On macOS, check Privacy & Security if blocked.
Touchpad
Overview
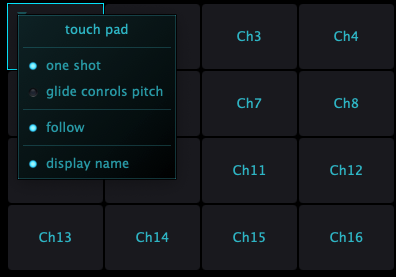
The touchpad is a matrix of cells, each cell represents a channel. Click and glide with the mouse to play channels in sequence. The PAD-Q knob sets the time quantization for switching between channels (e.g., 1/16, 1/8D, 1/4T).
Glide Controls Pitch
When Glide Controls Pitch is enabled, each touchpad cell uses its own channel as the pitch reference: at the cell’s center the offset is 0 semitones. Horizontal (X) movement maps −12…+12 semitones left→right, and vertical (Y) movement maps −12…+12 top→bottom. Combined, the extremes yield up to ±24 semitones relative to that channel cell (e.g., top-left −24, bottom-right +24).
Automation
Touch X/Y and Pitch X/Y are exposed as distinct automatable parameters. Touch X/Y reports the raw pad position, while Pitch X/Y reports the pitch-mapped offsets (±12 semitones per axis, ±24 corner to corner). Both can be recorded and edited via host automation.
Follow
When Follow is enabled from the touchpad menu, clicking a cell also focuses and displays that channel in the main UI.
One Shot
When One Shot is enabled from the touchpad menu, a triggered channel plays once. When disabled, the channel loops until the mouse pointer exits the pad or you release.
Rename Channels
Right-click a cell and choose Rename, or press Ctrl and left-click to rename the channel. While the name field is focused, press Tab to jump to the next channel.
Channel Controls
Core Controls
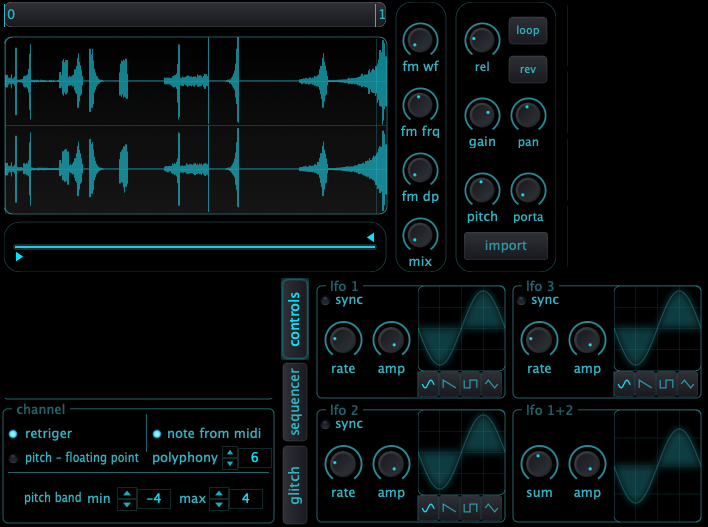
- Gain: sets the output level of the channel.
- Pan: places the channel in the stereo field.
- Release: tail length after note off.
Playback and Pitch
- Pitch: transpose the sample.
- Pitch - floating point: choose Continuous (floating) or Semitone steps.
- Portamento: time-based glide between notes.
- Loop: play the defined region in a loop.
- Reverse: play the sample backwards.
- Retrigger: restart sample/envelope on each new note.
- Pitch Bend: responds to MIDI Pitch Bend for expressive control.
FM Synthesis
Enable the built-in FM oscillator to modulate the sample. Adjust the FM amount to add harmonic motion and metallic textures.
Sequencing and Modulation
- Per-channel Sequencer: pattern-based control for rhythm and parameters.
- LFOs: three LFOs per channel for time-varying modulation.
- LFO 1+2 Merge: combined mode for richer movement using LFO1 and LFO2 together.
Glitch
Per-channel Glitch effect for stutters, reverses, and buffer manipulations to create aggressive rhythmic artifacts.
Multi-Channel Edit
Hold Shift while adjusting a control to apply the same parameter change to all channels.
Loading Files
Methods
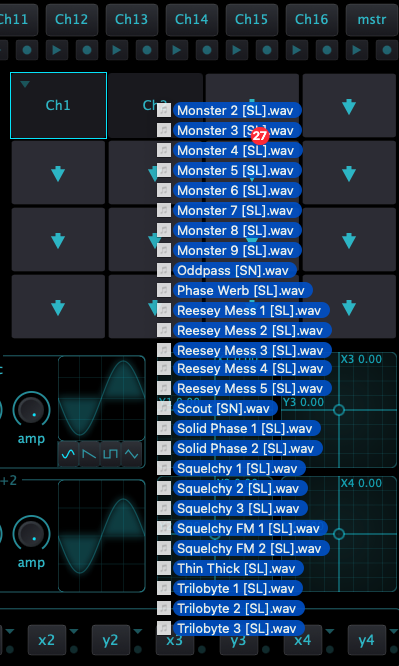
- Multi-file drop on the Touchpad: select multiple audio files and drop them on a touchpad cell. Files are assigned to channels starting from the drop target upward.
- Drag to Channel: drop an audio file directly onto a channel’s waveform area to replace its sample.
- Import: click Import in the player to open a file chooser and select a file from disk.
Supported Formats
macOS
- .wav, .mp3, .aif, .aiff, .aifc, .flac, .ogg, .aac, .m4a, .mp4, .caf
Windows
- .wav, .mp3, .aif, .aiff, .aifc, .flac, .ogg, .aac, .m4a, .mp4, .wma, .asf
Notes
- Audio tracks in .mp4 and .m4a are supported.
- If a file is not supported, the load will be rejected.
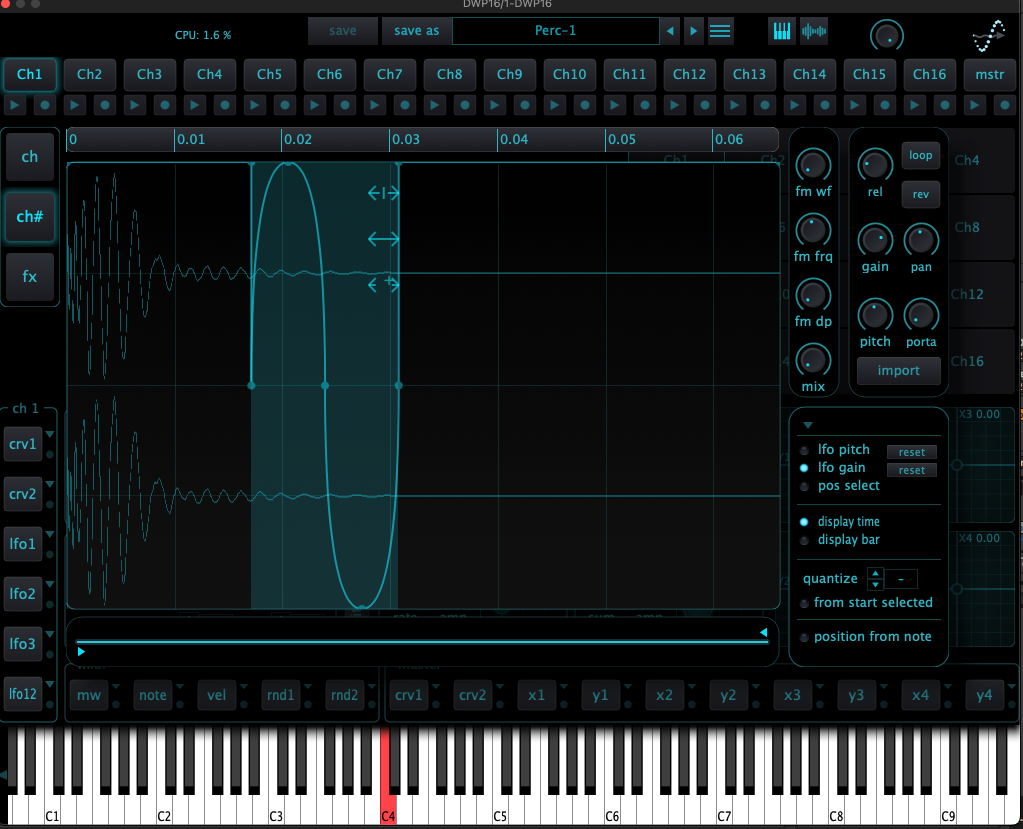
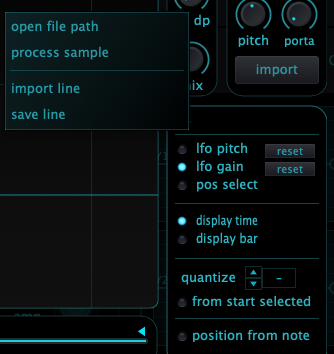
Channel Editor (Ch#)
LFO Line for Pitch and Gain
The editor provides two modulation lanes: LFO Pitch and LFO Gain. Use the mode switcher to choose which lane you are editing. The lane you select drives pitch or gain over time for the current channel.
Editing Basics
- Add control points: double-click to create a control point on the curve. Drag points to reshape the modulation. Segments between points interpolate smoothly.
- Select region: hold Ctrl and drag over the waveform area to select a range.
- Loop selection: set loop in/out points with single-sample resolution.
- Delete: press Del to remove selected points or the selected region.
- Insert shape: right-click inside a selection to insert a predefined shape such as Sine, Saw, Square, or Triangle. The shape is fitted to the selected range.
Transform Tools
After inserting or selecting a range, on-canvas controls appear for quick transforms:
- Move: shift the selection in time or offset its level.
- Multiply: scale the amplitude of the modulation.
- Compress/Expand: time-scale the selection to contract or stretch its duration.
Process to Sample
From the editor menu you can render the current channel to audio: the sample is processed through the channel parameters and the specified number of loop iterations, and the resulting audio is reloaded into the channel.
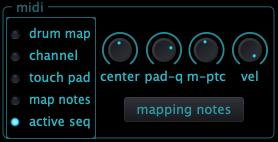
MIDI Input Modes
Modes
- Drum Map: each MIDI note triggers a different channel. Use this to play multiple channels from the keyboard.
- Channel: the keyboard plays the currently selected channel at the incoming pitch.
- Touchpad: incoming MIDI notes set the pitch and velocity but do not emit note-on by themselves. Sound is produced only when you click/drag on the touchpad, using the last received MIDI note as the pitch.
- Map Note: map specific notes to specific channels via the Note Mapping table.
- Active Seq: plays channels whose per-channel sequencers are active (in Play), ignoring channels that are in Record.
MIDI Section Controls
- Center: defines the reference note, default C4. Transposition is measured relative to this note.
- Pad-Q: touchpad glide quantize. Sets the musical division that governs how fast the touchpad steps between channels while gliding (e.g., 1/16, 1/8, 1/4).
- M-Pitch: master pitch offset applied to the current mode, in semitones.
- Vel: velocity influence percentage. At 0% the engine uses a fixed velocity of 127 and ignores incoming MIDI velocity.
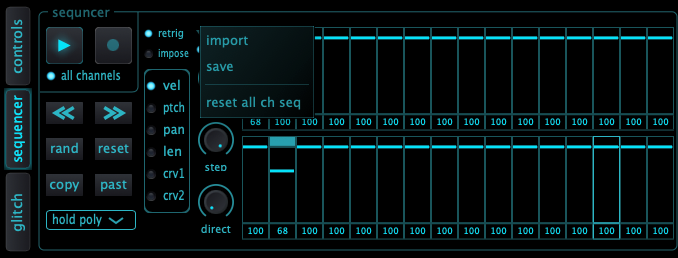
Sequencer
Structure
Per-channel sequencer with 32 patterns. Each pattern provides lanes for VEL, PITCH, PAN, LEN, CRV1, and CRV2. The Master sequencer adds a CH lane. CRV1 and CRV2 are free modulation lanes assignable to parameters.
Pattern Operations
- ALT + click a pattern: broadcast the clicked pattern’s content to all 32 patterns of the current channel.
- >> and <<: shift all pattern values right/left with wrap-around.
- COPY and PASTE: duplicate a sequencer setup to another channel.
Recording from MIDI
During recording, incoming MIDI Pitch and Velocity are captured into the active pattern lanes.
Play Modes
- Gate: playback runs while a key is held and stops on note-off. New note updates pitch; with Retrig enabled it restarts the step/envelope, otherwise plays legato.
- Hold Mono: playback continues while any key is held. Mono, last-note priority; new notes update pitch (Retrig on/off as above). Stops when the last key is released.
- Hold Poly: each held note adds a voice/layer; releasing that note removes its layer. Multiple notes can run simultaneously.
- Toggle Mono: first key press toggles playback on, next press (any key) toggles off. Single voice; additional notes while on change pitch (Retrig behavior applies).
- Toggle Poly: each key press toggles that note’s layer on/off, allowing stacked layers that persist without holding keys.
- Latch: key press starts latched playback that continues after key release. Additional notes add layers; press the same note again to remove its layer or use Clear/Stop to end all.
Sync and Rate
- Sync: rate uses musical divisions (e.g., 1/16, 1/8T, 1/4), tied to the selected tempo source (Host BPM or Internal BPM).
- No Sync: rate is time in milliseconds.
- Beat: selects the division when in Sync (e.g., 1/16, 1/16D, 1/8T). In No Sync, sets the rate in ms.
Length and Direction
- Step: number of patterns to cycle through before wrap.
- Direction:
- Forward
- Back
- For&Back 1: ping-pong with endpoints repeated.
- For&Back 2: ping-pong without repeating endpoints.
- Rand: jumps to a random pattern on each hop, clocked by Sync/No-Sync rate.
Randomize and Reset
- RAND: writes random values across the currently selected lane of the current channel.
- RESET: resets the shown lane of the current channel to defaults.
Retrigger and Impose
- Retrigger: step retrigger behavior on MIDI events.
- Impose: choose whether non-selected patterns inherit from the last selected or from the current pattern.
Shift Modifiers
Holding Shift applies these controls to all channels: Play, Record, Retrig, Impose, Sync, Beat, Step, Direction, >>/<<, Play Mode.
- RAND with Shift: randomizes all lanes of the current channel.
- RESET with Shift: resets all lanes of the current channel.
All-Channels Recording Behavior
When ALL CHANNEL is enabled and recording is active, an incoming MIDI or touch event writes to the active channel’s pattern and advances the current pattern index by one for all sequencers whose Record is enabled.
Global Apply
With ALL CHANNEL checked, PLAY and RECORD affect all channels except the Master.
Master: Channel Jumper
In CHANNEL JUMPER mode, each Master pattern targets a different channel. The PLAY state is indicated in purple. In this mode, touchpad navigation does not produce audio; only MIDI that drives the Master sequencer will play when PLAY is enabled.
Menu
- Save: saves the current sequencer setup (patterns, lanes, and options) as a preset.
- Import: loads a saved sequencer preset into the current channel.
- Reset All Ch Seq: resets sequencers for all channels.
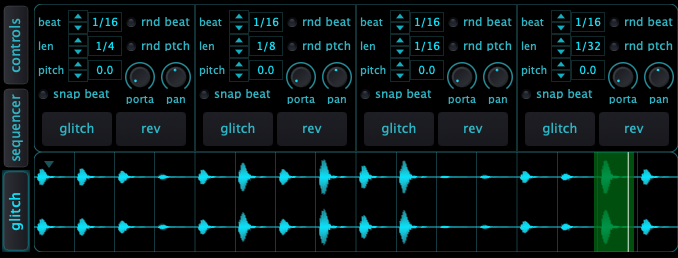
Glitch
Each channel includes its own Glitch engine, and there is also a Master Glitch. The engine provides four templates combining glitch and reverse actions. Glide with the mouse to morph between templates.
Per-Template Controls
- Portamento
- Pitch
- Len
- Beat
- Rand Beat
- Rand Pitch
Timing
- Snap Beat: effect length follows pitch-induced speed changes and may drift from the grid.
- Snap to Beat: effect length stays locked to the beat grid regardless of pitch changes.
Automation
The template morph for glitch/reverse is automatable.
Preset and Routing
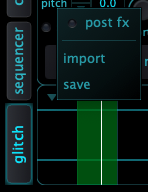
- Import/Save
- Pre/Post Effects
Effects
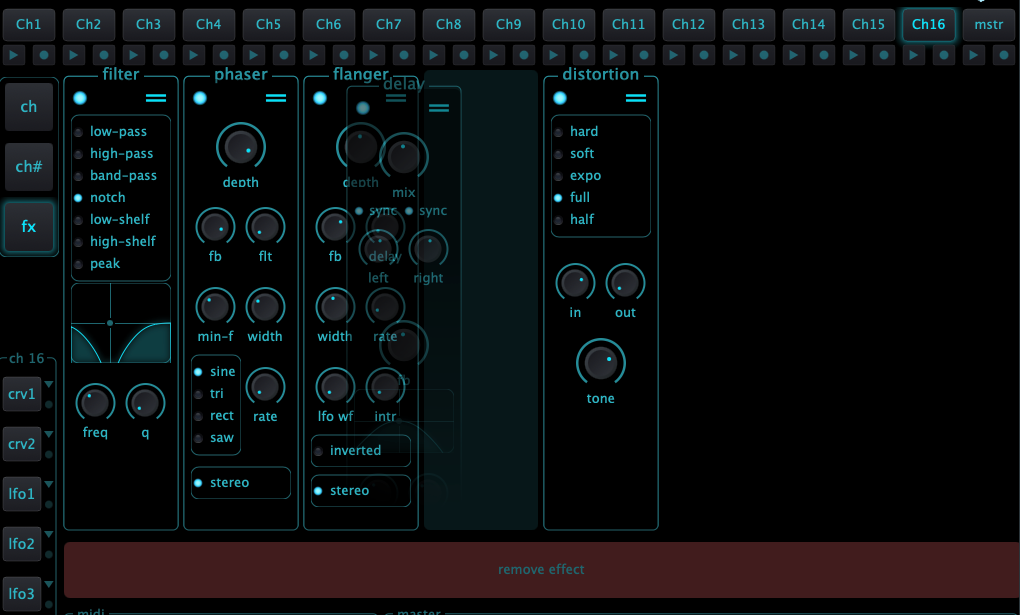
Each channel and the Master include an effects rack. Available types: Delay, Reverb, Flanger, Chorus, Filter, Phaser, Robotizer/Whisperizer, Distortion.
Instances and Limits
You can load multiple instances of the same effect type. Up to 8 effects per channel.
Add, Remove, Reorder
- Add: drag an effect from the bottom tray of the Effects tab into the rack.
- Remove: drag an effect module down into the bottom tray.
- Order: processing runs left to right. Drag modules to change their position in the chain.
Per-Channel vs Master
Channel racks process only their respective channel. The Master rack processes the overall plugin output.
Modulation and Automation
Effect parameters are mappable to internal modulation (LFOs, sequencer lanes, XY pads) and are available for host automation.
Presets
Library and First Launch
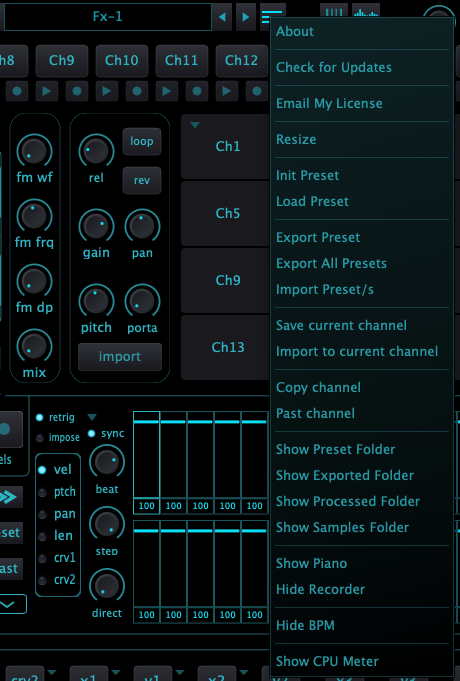
On first launch the plugin populates the default presets into its library folder. Open it via the menu: Show Preset Folder. When you save presets, they are written to this library.
Init Preset
Resets the plugin to a blank state: no samples loaded and all parameters at their defaults.
Per-Channel Save/Load
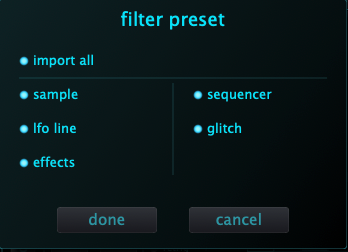
Save a single channel and load it into another channel. On load, a selection dialog opens so you can choose which components to apply: Sample, LFO Line, Effects, Sequencer, Glitch.
Copy/Paste Channel
Copy Channel and Paste Channel perform the same transfer instantly without a file chooser, using a temporary internal preset. On paste, a selection dialog opens so you can choose which components to apply: Sample, LFO Line, Effects, Sequencer, Glitch.
Export and Import
- Export Preset: packages the preset together with all referenced audio files for use on another machine.
- Export All Presets: exports the entire preset library as packages.
- Show Exported Presets: opens the folder containing exported packages.
- Import Presets: installs exported preset packages into the library.
Load vs Import
Load Preset reads a local preset that references audio files by path on this system. Import Preset installs a self-contained package that already includes the required audio files.

Modulation
Per-Channel Sources
- LFO1, LFO2, LFO3
- LFO1+2 merge
- Sequencer CRV1, CRV2
MIDI Sources
- Mod Wheel (CC1)
- Note
- Velocity
- Rand Note 1
- Rand Note 2
Master Sources
- Master Sequencer CRV1, CRV2
- XY Pads: X1, X2, X3, X4 and Y1, Y2, Y3, Y4
Mod Learn and Assign
Click a modulation source to enter Mod Learn  . The target control shows a ring above the knob
  . Drag over the
ring
to set the modulation range.
Range and Polarity
Right-click the target knob to choose range behavior: positive only, negative only, or bipolar around the current value.
Unassign
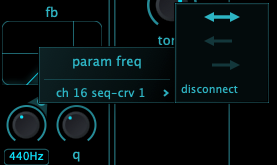
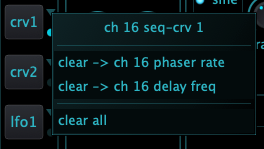
- From the source menu (triangle): open the assignment list and choose Clear for a single target or
Clear All.
- Right-click the target control: show all linked sources and choose Disconnect.
- While Mod Learn is active: set the modulation amount to 0% to remove the link.
Status Indicators
- Linked but source disabled: the ring above the knob is greyed out.

- Source linked: a lit status indicator appears next to the modulation source in the sources
list/panel.

- Mod Learn active: the ring and the selected range are illuminated.

Recorder
Location and View
The Recorder resides in the bottom panel of the plugin. Use the top-bar buttons or from main menu to switch the lower panel between MIDI Keyboard view and Recorder view.

Input Sources
- Plugin mode: Internal (from the plugin) or Sidechain.
- Standalone mode: Internal or External Source (audio interface). External input requires microphone permission.
Auto Record
- Auto: starts recording when the level crosses a Threshold (dB) or when a MIDI event arrives.
- Threshold: set the level that arms the recorder for Sidechain or External sources.
Workflow
- After recording, drag the take into a plugin channel or any target that accepts audio files.
- Sample rate follows the Host rate in plugin mode or the Standalone rate.
- While playing, dragging over the waveform scrubs the playhead. While paused, you can drag the clip out to drop it elsewhere.
Export
Use Export to save the recorded take and name the file.
